IFC6309 Wiki
Getting Started
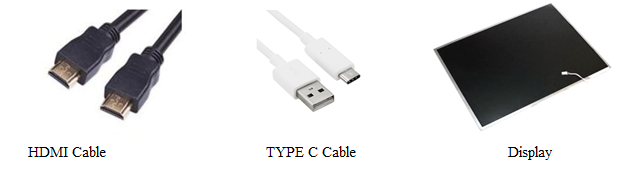
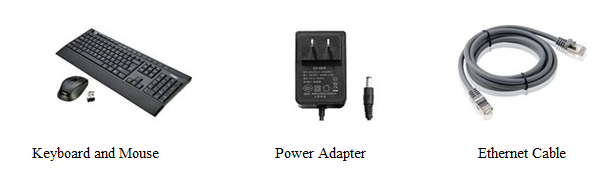
Hardware Required:
Software Required:
- android-tools-fastboot
To install the software run the following command:
sudo apt-get install android-tools-fastboot
Flashing the image
Step 1: Untar the Linux Image
1 2 | $ tar -xvzf IFC6309-shunya-desktop-image-0.1.zip
$ cd IFC6309-shunya-xxx-image-0.1
|
Note
Replace xxx with console or desktop according to the image you have downloaded
Step 2: Connecting Cables
Connect USB Type C cable to the host and board(next to the Debug UART).
Press the volume button and connect the 12V@2A Power Adapter. Keep the volume button pressed for few seconds even after inserting the power button.
Confirm if the cables are connected correctly using dmesg command. You should get a serial number of the device.
Sample dmesg Log:
1 2 3 4 5 6 | [ 8454.847947] usb 2-2: new high-speed USB device number 18 using xhci_hcd
[ 8455.003058] usb 2-2: New USB device found, idVendor=18d1, idProduct=d00d
[ 8455.003063] usb 2-2: New USB device strings: Mfr=1, Product=2, SerialNumber=3
[ 8455.003066] usb 2-2: Product: Android
[ 8455.003069] usb 2-2: Manufacturer: Google
[ 8455.003072] usb 2-2: SerialNumber: a88f3c50
|
Step 3: Install binaries on the IFC6309 board. This may take about 2-3 minutes
$ ./flash-minimum-binaries.sh
Step 4:Boot your newly installed Linux OS
Connect HDMI cable
Reboot the board by removing the power supply and connecting it back or using the command below:
sudo fastboot reboot
Remove USB Type C cable (important)
Warning
Plug the HDMI cable before powering up. HDMI hot plug may not work.
Note
Congratulations! You are now booting your newly installed Shunya OS directly from UFS on IFC-6309!
Login details
For user shunya the login details are:
Username: shunya
Password: shunya
For the root user the login details are:
Username: root
Password: toor
Using a Camera on IFC6309
Using GStreamer
To record a video in the avi format use the following command
gst-launch-1.0 v4l2src device=/dev/video3 ! avimux ! filesink location=filename.avi -e
To record a video in the mkv format use the following command
gst-launch-1.0 -e v4l2src device=/dev/video3 ! videoconvert ! matroskamux ! filesink location=filename.mkv
Note
Device number might change so be careful.
Using FFMPEG
To install ffmpeg use the following command:
sudo apt install ffmpeg
To check the index of the USB use v4l-utils.You can install it and get the index using the commands below:
sudo apt install v4l-utils
v4l2-ctl --list-devices
To record a video using ffmpeg the following command can be used:
ffmpeg -i /dev/video3 filename.avi
OR
ffmpeg -f v4l2 -video_size 640x480 -i /dev/video3 -c:v libx264 filename.mp4
Sound on IFC6309
Sound recording and playback is tested using a USB Mic and a Speaker connected to USB Sound Adapter.
Note
Device and card numbers might change so be careful.
Sound Recording
To list the recording devices you can use this command:
arecord -l
To record a wav file you can use the following command:
arecord -vv -Dplughw:1,0 -f dat filename.wav
Sound Playback
To list the playback devices use this command:
aplay -l
To playback a wav file you can use the following command:
aplay -vv --device=hw:1,0 filename.wav
OpenCV on IFC6309
Install OpenCV-3.3
sudo opkg install python3-opencv
Test OpenCV-3.3
1 2 3 4 5 | sudo apt install git
git clone https://github.com/shunyaos/object-recognition-dnn.git
git checkout ifc6309
cd object-recognition-dnn
python3 detect.py
|
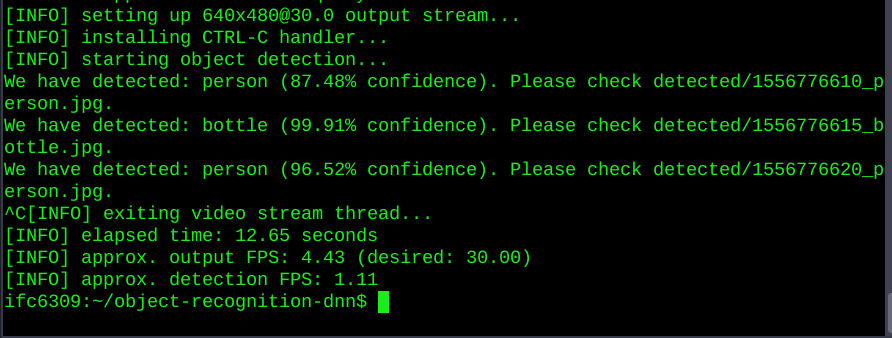
Test Outcome
Release info
Shunya O/s Version: 0.1-Beta
Kernel Version: 4.4.23
Bootloader: LK
Bootloader Version: dragonboard410c-LA_BR_1_2_7-03810-8x16_0-linaro2
Desktop Environment: XFCE