Rock960-AB Wiki
Getting Started
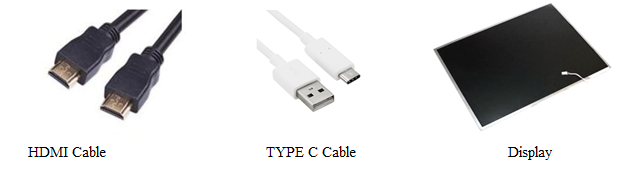
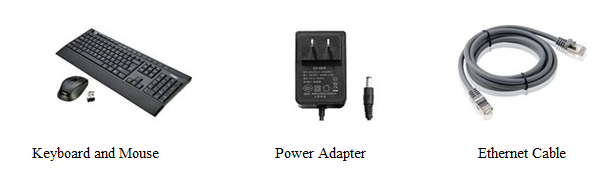
Hardware Required:
STEP 1 : Install build dependency for rkdevtool which is used for flashing
1 | $ sudo apt-get install libudev-dev libusb-1.0-0-dev dh-autoreconf
|
STEP 2 : Compile rkdevtool
1 2 3 4 5 | $ git clone https://github.com/rockchip-linux/rkdeveloptool
$ cd rkdeveloptool
$ autoreconf -i
$ ./configure
$ make
|
Now you have rkdeveloptool executable at the current directory.
1 | $ sudo cp rkdeveloptool /usr/local/bin/
|
STEP 3 :Boot device into maskrom mode
Maskrom mode is the code inside the Rockchip SoC running and waiting for commands from USB when there is no external bootable media. To put the device into maskrom mode:
power on rock960
plug the rock960 to Linux desktop with USB type A to type C cable
press and hold the maskrom key, then short press reset key
release mask rom key(important!)
On the host PC, lsusb should show the following VID/PID if the board is in maskrom mode: Bus 003 Device 061: ID 2207:0011
STEP 4 : Prepare the flash environment
Run the following command to download and run the mini loader to init DRAM and prepare flashing environment:
1 | $ sudo rkdeveloptool db rk3399_loader_v1*.bin
|
Step 5: Flash images onto ROCK960 eMMC and reboot
Write the image to eMMC with the following command and address:
1 | $ sudo rkdeveloptool wl 0 system.img
|
This will take a while, after it finishes, run
1 | $ sudo rkdeveloptool rd
|
Now you reboot to the new image on eMMC.
Using a Camera on Rock960-AB
Using GStreamer
To record a video in the avi format use the following command
gst-launch-1.0 v4l2src device=/dev/video8 ! avimux ! filesink location=filename.avi -e
To record a video in the mkv format use the following command
gst-launch-1.0 -e v4l2src device=/dev/video8 ! videoconvert ! matroskamux ! filesink location=filename.mkv
Note
Device number might change so be careful.
Using FFMPEG
To install ffmpeg use the following command:
sudo apt install ffmpeg
To check the index of the USB use v4l-utils.You can install it and get the index using the commands below:
sudo apt install v4l-utils
v4l2-ctl --list-devices
To record a video using ffmpeg the following command can be used:
ffmpeg -i /dev/video8 filename.avi
OR
ffmpeg -f v4l2 -video_size 640x480 -i /dev/video8 -c:v libx264 filename.mp4
Sound on Rock960-AB
Sound recording and playback is tested using a USB Mic and a Speaker connected to USB Sound Adapter.
Note
Device and card numbers might change so be careful.
Sound Recording
To list the recording devices you can use this command:
arecord -l
To record a wav file you can use the following command:
arecord -vv -Dplughw:2,0 -f dat filename.wav
Sound Playback
To list the playback devices use this command:
aplay -l
To playback a wav file you can use the following command:
aplay -vv --device=hw:2,0 filename.wav
OpenCV on Rock960-AB
Install OpenCV-3.3
sudo opkg install python3-opencv
Test OpenCV-3.3
1 2 3 4 5 | sudo opkg install git
git clone https://github.com/shunyaos/object-recognition-dnn.git
git checkout rock960
cd object-recognition-dnn
python3 detect.py
|
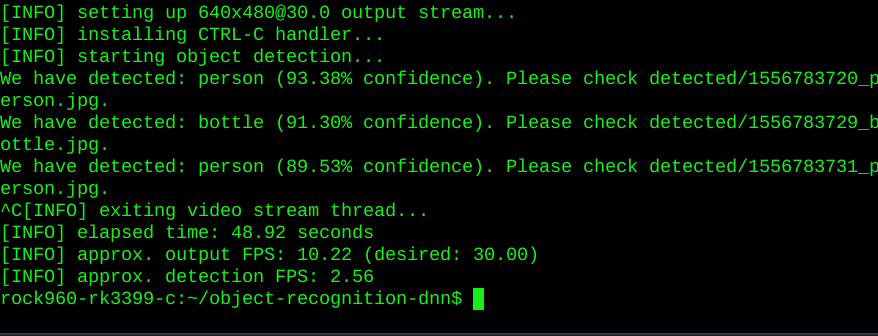
Test Outcome
Tensorflow on Rock960-AB
This image comes pre-installed with Tensorflow-1.9
Release info
Shunya O/s Version: 0.1-Beta
Kernel Version: 4.4.154
Bootloader: U-BOOT
Bootloader Version:
Desktop Environment (if applicable): XFCE